【Next.js】StripeとFirebaseにユーザー&クレカ登録同期処理ハンズオン

Next.jsで決済処理を実装したいという場合、FirebaseとStripeへ同時にユーザー登録をしたいという場合があるはずです。(厳密には、Stripeは顧客登録)
今回はStripeとFirebase Authenticationへのユーザー登録を同期させ、その後、クレジットカードを登録するという仕組みが体験できるハンズオンを進めていきます。
- 前提として
- 全体の仕組み
- ベースプロジェクトの準備
- Firebaseの準備
- StripeとFirebase Authenticationのユーザー登録同期
- StripeのtokenをFirestoreに格納する
- token作成をトリガーにしたStripe sourceの作成
前提として
以下の項目については詳しく説明しませんので、理解しているという前提で進めていきます。
- Firebaseの設定
- Firebase Authentication
- HOC(高階コンポーネント)
- Stripeへのアカウント登録
また、以下の記事を参考にしていただければ、上記の前提知識についても身に付けられるかと思います。
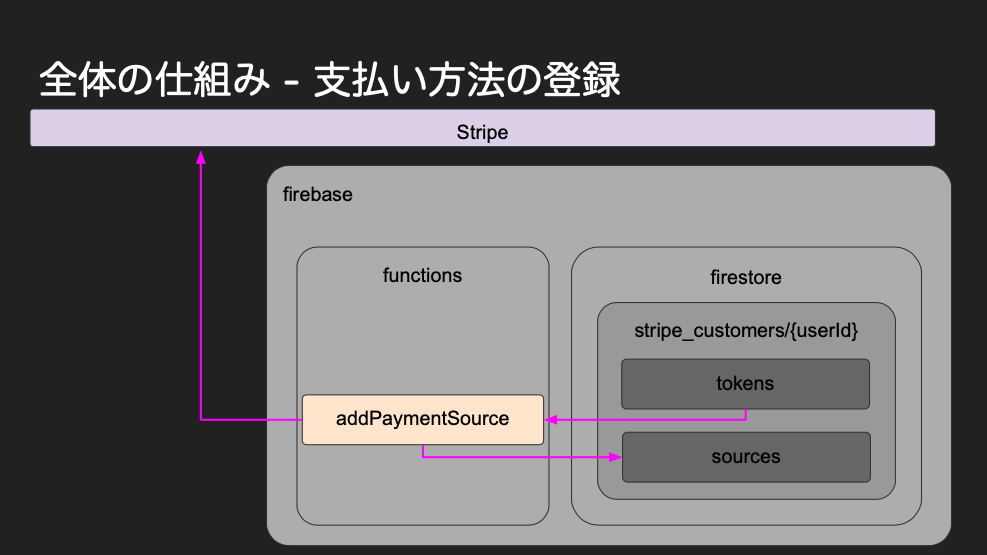
全体の仕組み
複雑ですが、以下の仕組みで今回の実装を進めていきます。

ベースプロジェクトの準備
まずはベースとなるNext.jsのプロジェクトをgit cloneしましょう。
$ git clone git@github.com:mesh1nek0x0/stripe-nextjs-on-firebase.git
次にプロジェクト内に移動し、今回使用するブランチへ移動します。
$ cd stripe-nextjs-on-firebase/
$ git checkout start
Firebaseの準備
次にFirebaseのプロジェクトを作成し、Firebase SDK snippetをプロジェクトの設定から取得しましょう。
(例)Firebase SDK snippet
<!-- The core Firebase JS SDK is always required and must be listed first -->
<script src="https://www.gstatic.com/firebasejs/7.1.0/firebase-app.js"></script>

<!-- TODO: Add SDKs for Firebase products that you want to use
     https://firebase.google.com/docs/web/setup#available-libraries -->
<script src="https://www.gstatic.com/firebasejs/7.1.0/firebase-analytics.js"></script>

<script>
  // Your web app's Firebase configuration
  var firebaseConfig = {
    apiKey: "xxxxxxxxxxxxxxxxxxxxxxxxxxxx",
    authDomain: "xxxxxxxxxxxxxxxxxxxxxxxxxxxx",
    databaseURL: "xxxxxxxxxxxxxxxxxxxxxxxxxxxx",
    projectId: "practice-pf-funclub",
    storageBucket: "xxxxxxxxxxxxxxxxxxxxxxxxxxxx",
    messagingSenderId: "xxxxxxxxxxxxxxxxxxxxxxxxxxxx",
    appId: "xxxxxxxxxxxxxxxxxxxxxxxxxxxx",
    measurementId: "xxxxxxxxxxxxxxxxxxxxxxxxxxxx"
  };
  // Initialize Firebase
  firebase.initializeApp(firebaseConfig);
  firebase.analytics();
</script>
次に.firebasercの中身を自身のFirebaseプロジェクト名に書き換えましょう。
{
  "projects": {
    "default": "practice-pf-funclub"
  }
}
.envをルートディレクトリに作成し、Firebase SDK snippetから取得したデータを以下のように書き換えましょう。
.env
apiKey=xxxxxxxxxxxxxxxxxxxxxxxxxxxx
authDomain=xxxxxxxxxxxxxxxxxxxxxxxxxxxx
databaseURL=xxxxxxxxxxxxxxxxxxxxxxxxxxxx
projectId=xxxxxxxxxxxxxxxxxxxxxxxxxxxx
storageBucket=xxxxxxxxxxxxxxxxxxxxxxxxxxxx
messagingSenderId=xxxxxxxxxxxxxxxxxxxxxxxxxxxx
appId=xxxxxxxxxxxxxxxxxxxxxxxxxxxx
// stripeのパブリッシュキー(pkから始まるもの)も同時に設定
stripeKey=xxxxxxxxxxxxxxxxxxxxxxxxxxxx
次にlib/firebase/index.jsの設定に追記し、firestoreを使用できるようにしておきます。
lib/firebase/index.js
import firebase from "firebase/app";
import "firebase/auth";
import "firebase/firestore";

const config = {
  apiKey: process.env.apiKey,
  authDomain: process.env.authDomain,
  databaseURL: process.env.databaseURL,
  projectId: process.env.projectId,
  storageBucket: process.env.storageBucket,
  messagingSenderId: process.env.messagingSenderId
};
if (!firebase.apps.length) {
  firebase.initializeApp(config);
}
const auth = firebase.auth();
const firestore = firebase.firestore();
export { auth, firestore, firebase };
Firebaseの料金プランを変更
実はFirebaseの料金プランがFreeのままの場合、Stripeのような外部へ通信することができません。
そのため、Firebaseのコンソールから料金プランを変更しておきましょう。
Blaze(従量課金制)だと、一定以下の通信は無料となるので、試しに使ってみる分にはこちらがおすすめです。
Firebase AuthenticationでGoogle登録を有効にする
Firebase Authenticationを使用してSNSユーザー登録を実装していきます。
そのため、FirebaseコンソールからFirebase AuthenticationのSNSユーザー認証におけるGoogleを有効にしておきましょう。
詳しくは以下の記事に記載されています。
nekorokkekun.hatenablog.com
StripeとFirebase Authenticationのユーザー登録同期
以下の順に処理を行っていきます。
- Next.js上でサインイン
- Firebase Authenticationでユーザーが作成される
- Firebase functionsのトリガーが起動
- Cloud Firestoreのstripe_customersコレクション以下にユーザーIDが保存される
- Stripeの顧客に登録される
上記の流れを図にすると以下のようになります。

工程は複雑ですが、実際はユーザー登録のみで一気に全て行えるように設定していきましょう。
現状の確認
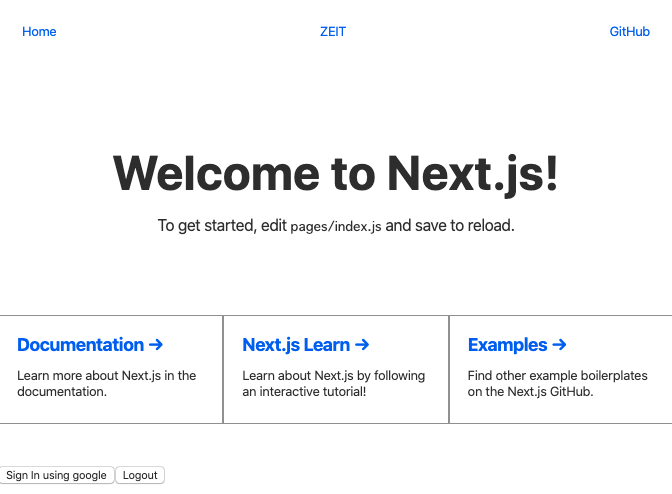
まずは現在のNext.jsの画面を確認してみましょう。
$ yarn install
$ yarn dev
これで http://localhost:3000 にアクセスしてみましょう。
すると以下のような画面が表示されます。

Firebase functions内の設定
まずはFirebase functionsの設定をしていきましょう。
Firebase functionsにStripeのSecret API Keyを設定
次にFirebase functionsの環境変数にStripeのSecret API Keyを設定します。
firebase functions:config:set stripe.token="sk_test_xxxxxxxxxxxxxxxxxxxxxx"
✔  Functions config updated.

Please deploy your functions for the change to take effect by running firebase deploy --only functions
Firebase functions本体の設定
次にFirebase functions本体を設定しましょう。
functions/index.js
const functions = require("firebase-functions");
const admin = require("firebase-admin");
admin.initializeApp();
const stripe = require("stripe")(functions.config().stripe.token);
const currency = functions.config().stripe.currency || "JPY";

exports.createStripeCustomer = functions.auth.user().onCreate(async user => {
  const customer = await stripe.customers.create({ email: user.email });
  return admin
    .firestore()
    .collection("stripe_customers")
    .doc(user.uid)
    .set({ customer_id: customer.id });
});
こちらは細かく解説をしていきます。
const functions = require("firebase-functions");
const admin = require("firebase-admin");
admin.initializeApp();
const stripe = require("stripe")(functions.config().stripe.token);
const currency = functions.config().stripe.currency || "JPY";
この辺りは必要なモジュールやライブラリなどを読んでいます。
functions.auth.user().onCreate
「Firebase Authenticationでのユーザーをトリガーに以下の処理を行う」という意味になります。
const customer = await stripe.customers.create({ email: user.email });
「Stripeの顧客作成を行う上でStripeのユーザーのemail情報にはFirebase Authenticationのユーザーのemailを設定する」という意味になります。
こちらで出てくるawaitの後の「stripe」は、先ほどaddしたstripeモジュールから呼び込んでいるものです。
  return admin
    .firestore()
    .collection("stripe_customers")
    .doc(user.uid)
    .set({ customer_id: customer.id });
「Firestoreのstripe_customersコレクション > user.uidドキュメント以下にcustomer_idフィールドを作成して値を格納する」という意味になります。
このFirebase functionsを設定することで、ユーザー登録をすることによって一気にStripeとFirebase Authenticationにユーザー登録をし、Firestoreにcustomer_idを格納するというところまでの処理が進みます。
Firebase functionsのデプロイ
functions/index.jsの設定をFirebase functionsにデプロイ するために、functionsディレクトリ内で以下のコマンドを入力しましょう。
$ yarn deploy
これで「✔ functions[createStripeCustomer(us-central1)]: Successful update operation. 」と表示されればデプロイ 完了です。
StripeのtokenをFirestoreに格納する
Stripeは、顧客のクレジットカード情報を私たちの代わりに保管してくれます。
そして登録されたクレジットカード情報を操作するためにはtokenを発行しなければなりません。
tokenの説明についてわかりやすい解説があったため引用します。
Stripeによるクレジットカード決済では何よりも”トークン”を取得する事が重要となります。
サービス提供者側では直接クレジットカードの情報を取得・管理する必要はなく、Stripe側でそれらを全て管理してくれます。
その際、Stripeが取得したクレジットカード情報を操作する為に実用となるのがこの”トークン”となります。
単発の決済であれば決済する際にクレジットカード情報をStrip経由で取得し、その取得した”トークン”に対して課金処理を行う事で実現します。
一方で定期的な課金を行う場合、取得した”トークン”情報を”顧客(Customer)”に結びつけ、その”顧客(Customer)”に対して課金処理を行う事で実現する事ができます。このように、Stripeでクレジットカード決済を実装する場合、何よりもこの”トークン”の取得と管理について理解する必要があります。
引用元:
https://erorr.org/104/#i
以下のような流れでこちらの処理を実現します。
- Next.jsでクレジットカード情報を入力
- Stripeからtokenを発行
- Firestoreへtokenを格納
上記の流れを図にすると以下のようになります。

クレジットカード登録ページの作成
まずはクレジットカードを登録するフォームがあるページを作成しましょう。
最初にReact上でStripeを使用する際の依存パッケージのインストールを行います。
$ yarn add react-stripe-elements
components/CheckoutForm.js
import React, { Component } from "react";
import { CardElement, injectStripe } from "react-stripe-elements";

class CheckoutForm extends Component {
  constructor(props) {
    super(props);
    this.submit = this.submit.bind(this);
  }

  async submit(ev) {
    const { token, error } = await this.props.stripe.createToken();
    this._element.clear();
    console.log(token);
  }

  render() {
    return (
      <div className="checkout">
        <p>Would you like to complete the purchase?</p>
        <CardElement onReady={c => (this._element = c)} />
        <button onClick={this.submit}>Purchase</button>
      </div>
    );
  }
}

export default injectStripe(CheckoutForm);
こちらは、Stripeのクレジットカード入力フォームコンポーネントです。
exportの際に「injectStripe」というHOCの引数にCheckoutFormコンポーネントを入れています。
このinjectStripeは公式によると…
injectStripe高次コンポーネント(HOC)を使用して、エレメントツリーに支払いフォームコンポーネントを構築します。
injectStripe HOCは、Elementsグループを管理するthis.props.stripeプロパティを提供します。
挿入されたコンポーネント内で、次のいずれかを呼び出すことができます。
- this.props.stripe.createPaymentMethod
- this.props.stripe.createToken
- this.props.stripe.createSource
- this.props.stripe.handleCardPayment
- this.props.stripe.handleCardSetup
参考:
GitHub - stripe/react-stripe-elements: React components for Stripe.js and Stripe Elements
フォームに入力したクレジットカードのデータをpropsに格納し、指定された5つの情報をpropsから取り出すことができるとのことです。
そして以下の通り、injectStripeによってcreateTokenの情報をpropsから取り出していますね。
  async submit(ev) {
    const { token, error } = await this.props.stripe.createToken();
    this._element.clear();
    console.log(token);
  }
pages/purchase.js
import React, { Component } from "react";
import Head from "next/head";
import { Elements, StripeProvider } from "react-stripe-elements";
import CheckoutForm from "../components/CheckoutForm";

export default class Purchase extends Component {
  constructor(props) {
    super(props);
    this.state = { stripe: null };
  }
  componentDidMount() {
    // Create Stripe instance in componentDidMount
    // (componentDidMount only fires in browser/DOM environment)
    this.setState({
      stripe: window.Stripe(process.env.stripeKey)
    });
  }

  render() {
    return (
      <StripeProvider stripe={this.state.stripe}>
        <div className="example">
          <Head>
            <script src="https://js.stripe.com/v3/" />
          </Head>
          <h1>React Stripe Elements Example</h1>
          <Elements>
            <CheckoutForm />
          </Elements>
        </div>
      </StripeProvider>
    );
  }
}
  componentDidMount() {
    // Create Stripe instance in componentDidMount
    // (componentDidMount only fires in browser/DOM environment)
    this.setState({
      stripe: window.Stripe(process.env.stripeKey)
    });
  }
stateのstripeにdotenvモジュールで環境変数のstripeKeyを呼び出し、設定しています。
現状の確認
ここまでできたら、
http://localhost:3000/purchase
にアクセスしてみましょう。
そうすると、クレジットカード番号・使用期限・CVCの入力フォームのあるページが表示されます。
tokenをユーザに紐付けて保存
現在、tokenはユーザに紐付いていません。
しかし、実際にはサインイン済みのユーザがクレジットカードの登録を行うため、サインインしたユーザとtokenが紐付いている状態が適切です。
そこでwithAuth(サインインユーザのみアクセスを認証するHOC)のstateに、サインインしたユーザの情報を保有させ、tokenを作成した際にユーザと紐付けを行いましょう。
ちなみにwithAuthというHOCについての解説は以下の記事に詳しく書かれています。
nekorokkekun.hatenablog.com
具体的には以下のようなコードになります。
components/helpers/withAuth.js
import React from "react";
import router from "next/router";
import { auth } from "../../lib/firebase";
const withAuth = Component => {
  return class extends React.Component {
    constructor(props) {
      super(props);
      this.state = {
        status: "LOADING",
        user: {}
      };
    }
    componentDidMount() {
      auth.onAuthStateChanged(authUser => {
        if (authUser) {
          this.setState( {
            status: "SIGNED_IN",
            user: authUser
          });
        } else {
          router.push("/");
        }
      });
    }
    renderContent() {
      const { status, user } = this.state;
      if (status == "LOADING") {
        return <h1>Loading ......</h1>;
      } else if (status == "SIGNED_IN") {
        return <Component {...this.props} currentUser={user} />;
      }
    }
    render() {
      return <>{this.renderContent()}</>;
    }
  };
};
export default withAuth;
こちらも重要なポイントの解説を行います。
        if (authUser) {
          this.setState( {
            status: "SIGNED_IN",
            user: authUser
          });
こちらで、認証したユーザのみ、認証ユーザの情報をstateへセットしています。
return <Component {...this.props} currentUser={user} />;
stateにセットした認証ユーザの情報をpropsに渡し、別のコンポーネントで使用できるようにしましょう。
CheckoutForm.jsにwithAuth.jsを追記します。
import React, { Component } from "react";
import { CardElement, injectStripe } from "react-stripe-elements";
import withAuth from "../components/helpers/withAuth";
import { firestore } from "../lib/firebase";

class CheckoutForm extends Component {
  constructor(props) {
    super(props);
    this.submit = this.submit.bind(this);
  }

  async submit(ev) {
    const { token, error } = await this.props.stripe.createToken();
    firestore
      .collection("stripe_customers")
      .doc(this.props.currentUser.uid)
      .collection("tokens")
      .add({ token: token.id })
      .then(() => {
        this._element.clear();
      });
  }

  render() {
    return (
      <div className="checkout">
        <p>Would you like to complete the purchase?</p>
        <CardElement onReady={c => (this._element = c)} />
        <button onClick={this.submit}>Purchase</button>
      </div>
    );
  }
}

export default withAuth(injectStripe(CheckoutForm));
tokenがサインインユーザに紐付いているか確認
http://localhost:3000 へアクセスし、クレジットカード情報を入力してサブミットしてみましょう。
ダミーデータとして
カード番号: 4242424242424242
期限:242
CVC:なんでも
郵便番号:なんでも
でテストができます。
サブミット後、Firestoreのstripe_customers > ユーザーID > tokens の中にランダムな英数字が入っていれば成功です。
token作成をトリガーにしたStripe sourceの作成
Stripeでtokenを作成した際にsourceというものを同時に作成します。
このsourceについては以下のサイトで詳しく解説がなされているため、引用します。
sourceは買い手が決済するために使う「モノ」を抽象化した概念であると言えます。その具象としては、クレジットカードやACH(銀行振込のようなもの)があります。1回きりの決済としてsourceに対して直接課金することもできますし、買い手に対して複数回課金するために買い手にsourceを関連付けておくこともできます。
こちらでは以下の処理を実装していきます。
- tokenをFIrestoreに格納
- Firebase functionsがtoken作成をトリガーにしてStripeへsourceの作成依頼を送信
- Stripeが依頼を受けてsourceを作成
- 作成されたsourceがFirestoreに格納
上記を図にした場合、以下のようなものになります。

functionsに追記
上記の処理は全てFirebase functionsで行うため、実装自体もfucntions/index.js内に書き込みましょう。
functions/index.js
// すでに実装したものは省略

exports.addPaymentSource = functions.firestore
  .document("/stripe_customers/{userId}/tokens/{pushId}")
  .onCreate(async (snap, context) => {
    const source = snap.data();
    const token = source.token;
    if (source === null) {
      return null;
    }

    try {
      const snapshot = await admin
        .firestore()
        .collection("stripe_customers")
        .doc(context.params.userId)
        .get();
      const customer = snapshot.data().customer_id;
      const response = await stripe.customers.createSource(customer, {
        source: token
      });
      return admin
        .firestore()
        .collection("stripe_customers")
        .doc(context.params.userId)
        .collection("sources")
        .doc(response.fingerprint)
        .set(response, { merge: true });
    } catch (error) {
      await snap.ref.set({ error: userFacingMessage(error) }, { merge: true });
      console.error(error);
      console.log(`user: ${context.params.userId}`);
    }
  });

function userFacingMessage(error) {
  return error.type
    ? error.message
    : "An error occurred, developers have been alerted";
}
Firebase functionsにデプロイ
以下のコマンドでFirebase functionsにデプロイ しましょう。
$ cd functions
$ yarn deploy
以下のように表示されていればデプロイ 成功です。
✔  functions[createStripeCustomer(us-central1)]: Successful update operation.
✔  functions[addPaymentSource(us-central1)]: Successful create operation.

✔  Deploy complete!
現状の確認
一度、Firebase Authenticationのユーザを削除した後にもう一度ユーザ認証を行い、クレジットカード情報の登録をしてみましょう。
FIrestoreのstripe_customers > ユーザID > sourcesに英数字が登録されていれば成功です。
これでStripeとFirebaseにユーザー&クレカ登録同期処理ハンズオンは完了しました。お疲れ様でした!