【Next.js】nowコマンドでAPIキーなどの環境変数を設定する
Next.jsでデプロイ前に環境変数を設定する際には以下のコマンドを用いることができます。
now secret add で環境変数を追加
$ now secrets add <secret-name> <secret-value>
以下は一例です。
$ now secret add FIREBASE_API_KEY xxxxxxxxxxxx
> Success! Secret firebase_api_key added
ルートディレクトリのnow.jsonに追加
ルートディレクトリにnow.jsonを作成し、先ほど now secret add で追加した環境変数を記述しましょう。
以下は一例です。
{
    "env": {
      "FIREBASE_API_KEY": "@firebase_api_key",
      "FIREBASE_AUTH_DOMAIN": "@firebase_auth_domain",
      "FIREBASE_DATABASE_URL": "@firebase_database_url",
      "FIREBASE_PROJECT_ID": "@firebase_project_id",
      "FIREBASE_STORAGE_BUCKET": "@firebase_storage_bucket",
      "FIREBASE_MESSAGING_SENDER_ID": "@firebase_messaging_sender_id",
      "FIREBASE_APP_ID": "@firebase_app_id",
      "stripeKey": "@stripekey"
    },
    "build": {
        "env": {
            "FIREBASE_API_KEY": "@firebase_api_key",
            "FIREBASE_AUTH_DOMAIN": "@firebase_auth_domain",
            "FIREBASE_DATABASE_URL": "@firebase_database_url",
            "FIREBASE_PROJECT_ID": "@firebase_project_id",
            "FIREBASE_STORAGE_BUCKET": "@firebase_storage_bucket",
            "FIREBASE_MESSAGING_SENDER_ID": "@firebase_messaging_sender_id",
            "FIREBASE_APP_ID": "@firebase_app_id",
            "stripeKey": "@stripekey"
        }
    }
  }
少し、変数を記述する際に癖があり、以下のように追加した場合には、
$ now secret add FIREBASE_API_KEY xxxxxxxxxxxx
> Success! Secret firebase_api_key added
以下のように「@」から始めなければならないようです。
"FIREBASE_API_KEY": "@firebase_api_key",
デプロイ
Next.jsでは以下のコマンドでデプロイできます。
$ now
もし、Firebase Authorizationなどを使用している場合には、
Firebase Authorization > ログイン方法 > 承認済みドメイン へ、nowでデプロイした際に発行されたドメインを追加しておきましょう。
参考
【Next.js】任意のクレジットカードでStripe決済

以前まとめたこちらの記事の続きとなります。
nekorokkekun.hatenablog.com
nekorokkekun.hatenablog.com
nekorokkekun.hatenablog.com
以前の段階で、StripeとFirestoreとFirebase Authenticationのユーザーを同時に作成し、登録したクレジットカードで単発決済を行うことに成功しました。
こちらの記事では、複数のクレカをFirestoreとStripeへ登録した上で、任意のクレジットカードでStripe決済ができるようにしていきます。
- 全体像の把握
- リポジトリのクローン
- ブランチの移動
- Firebaseとの接続
- 商品一覧・詳細画面の作成
- Payableコンポーネントの作成
- Firebaseへ決済情報の登録
- Firebase FunctionsでStripeに単発決済処理を送信
- 動作確認
全体像の把握
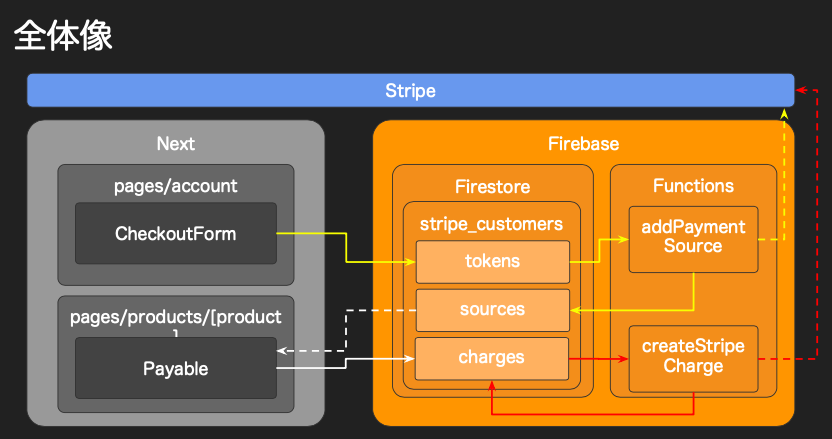
以前の実装も含んでいるため複雑に見えますが、今回やるべきことは以下の通りです。
リポジトリのクローン
まずは今回使用するリポジトリをクローンしていきましょう。
$ git clone git@github.com:mesh1nek0x0/stripe-nextjs-on-firebase.git
ブランチの移動
現在、リポジトリをクローンした時点でmasterブランチにいます。
以下のgitコマンドを入力し、register-cardというタグのブランチを取得してください。
$ git checkout -b hogehoge register-card
hogehogeは、register-cardというタグの付くブランチをコピーする新たなブランチ名です。このブランチの命名はなんでも構いません。
そして次のコマンドを入力します。
$ yarn install
$ ✨ Done in 20.32s.
と出れば成功です。
Firebaseとの接続
次にクローンしたリポジトリを、事前に作成しておいたFirebaseのプロジェクトと接続させましょう。
Firebaseプロジェクトの作成については、以下をご覧の上、参考にしてください。
nekorokkekun.hatenablog.com
.env(新規作成)
apiKey=xxxxxxxxxxxxxxxxxxxxxxxx
authDomain=xxxxxxxxxxxxxxxxxxxxxxxx
databaseURL=xxxxxxxxxxxxxxxxxxxxxxxx
projectId=xxxxxxxxxxxxxxxxxxxxxxxx
storageBucket=
messagingSenderId=xxxxxxxxxxxxxxxxxxxxxxxx
appId=xxxxxxxxxxxxxxxxxxxxxxxx
stripeKey=xxxxxxxxxxxxxxxxxxxxxxxx
.envのstripeKeyに関しては以下が参考になります。
nekorokkekun.hatenablog.com
.firebaseerc
{
  "projects": {
    "default": "xxxxxxxxxxxxxxx"
  }
}
商品一覧・詳細画面の作成
商品一覧表示のページと、商品1つ1つの詳細画面表示ページを作成します。
pagesディレクトリ以下に、下記のディレクトリとファイルを作成しましょう。
products
 ┣ [product].js
 ┗ index.js
index.jsが商品一覧ページ、[product].jsが商品詳細ページとなります。
Next.jsでは、ファイル名を[ ]で囲うことでGETパラメータによる動的なルーティングが可能となります。
商品一覧画面の作成
まずは商品一覧画面を作成します。
pages/products/index.js
import React from "react";
import Link from "next/link";
import { firestore } from "../../lib/firebase";

function Products(props) {
  return (
    <>
      <h1>pages/products</h1>
      <Link href="/">
        <a>Go back to TOP</a>
      </Link>
      <ul>
        {props.products.map(product => {
          return (
            <li key={product.id}>
              <Link href="/products/[product]" as={`/products/${product.id}`}>
                <a>{product.pageName}</a>
              </Link>
              <ul>
                <li>{product.artistName}</li>
                <li>{product.monthlyFee}</li>
              </ul>
            </li>
          );
        })}
      </ul>
    </>
  );
}

Products.getInitialProps = async () => {
  const result = await firestore
    .collection("fanPages")
    .get()
    .then(snapshot => {
      let data = [];
      snapshot.forEach(doc => {
        data.push(
          Object.assign(
            {
              id: doc.id
            },
            doc.data()
          )
        );
      });

      return data;
    });
  return { products: result };
};

export default Products;
商品詳細画面の作成
次に商品詳細画面を作成します。
import React from "react";
import { auth, firestore } from "../../lib/firebase";
import Link from "next/link";

class Product extends React.Component {
  constructor(props) {
    super(props);
    this.state = {
      isLogin: false,
      user: {}
    };
  }

  componentDidMount() {
    auth.onAuthStateChanged(authUser => {
      if (authUser) {
        const state = Object.assign(this.state, {
          isLogin: true,
          user: authUser
        });
        this.setState(state);
      } else {
        this.setState({
          isLogin: false,
          user: {}
        });
      }
    });
  }

  render() {
    return (
      <>
        <h1>pages/products/[product]</h1>
        <Link href="/products">
          <a>Go Back to Products List</a>
        </Link>
        <h2>PRODUCT DETAIL</h2>
        <ul>
          <li>PRODUCT NAME: {this.props.product.pageName}</li>
          <li>MONTHLY FEE: {this.props.product.monthlyFee}</li>
        </ul>
        <button>
          {this.state.isLogin
            ? `BUY as ${this.state.user.displayName}`
            : "PLEASE LOGIN"}
        </button>
      </>
    );
  }

  static async getInitialProps({ query }) {
    const result = await firestore
      .collection("fanPages")
      .doc(query.product)
      .get()
      .then(snapshot => {
        return snapshot.data();
      });
    return { product: result };
  }
}

export default Product;
特筆すべきポイントのみ解説をします。
ログイン状態か確認
  componentDidMount() {
    auth.onAuthStateChanged(authUser => {
      if (authUser) {
        const state = Object.assign(this.state, {
          isLogin: true,
          user: authUser
        });
        this.setState(state);
      } else {
        this.setState({
          isLogin: false,
          user: {}
        });
      }
    });
  }
コンポーネントがマウントされた段階で、アクセスユーザーがログインしているかどうかを確認しています。
ログインにはFirebase Authenticationを使用しています。
これは以前実装した通りなので、以下の記事をご覧ください。
nekorokkekun.hatenablog.com
ログインユーザーと未ログインユーザーで表示の出し分け
        <button>
          {this.state.isLogin
            ? `BUY as ${this.state.user.displayName}`
            : "PLEASE LOGIN"}
        </button>
こちらでは三項演算子を用いて、
- ログインユーザーには、値段の表示されたボタンの表示
- 未ログインユーザーには、「PLEASE LOGIN」というボタンの表示
を行っています。
商品情報の取得
    const result = await firestore
      .collection("fanPages")
      .doc(query.product)
      .get()
      .then(snapshot => {
        return snapshot.data();
      });
    return { product: result };
こちらは一般的なFirestoreのデータ取得のためのコードですが、注目すべきは
.doc(query.product)
です。
query.productには何が入っているかというと、GETパラメータのproducts/以降の乱数文字です。
そして、この乱数文字が何かというと、FirestoreのfanPagesの次層のドキュメント内に自動生成されたIDです。
GETのクエリパラメータに渡ってきた乱数文字に対応するIDのデータを取得し、pages/products/[product].jsへ引き渡しているというわけです。
Firestoreにデータの登録
これで商品一覧・詳細画面がそれぞれ作成されました。
しかし、まだ表示すべきデータが入っていないはずです。
そこでFirestoreのコンソールにアクセスし、データを直接登録していきましょう。

値は何でも構いませんが、データ取得後にリストレンダリングをするため、
- fanPages(コレクション)
- pageName
- monthlyFee
- artistName
はそのままで作成してください。
この状態で、
http://localhost:3000/products
にアクセスして見ましょう。
そうすると以下のような画面が表示されるはずです。

Firestoreに複数のドキュメントを登録すると、商品一覧数がそれに対応して増えていく仕組みです。
Payableコンポーネントの作成
次に登録したクレジットカードからどのカードで払うかを選択するためのPayableコンポーネントを作成していきましょう。
図で表すと、このような流れになります。
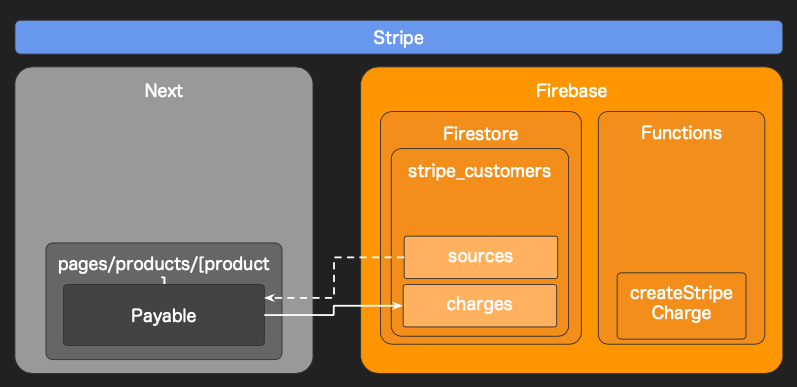
上記の図を以下のような流れで実現します。
- クレジットカードをブラウザ上で選択
- 選択されたクレジットカードのsourceを取得
- 支払い確認 > 支払い確定の流れをhenadleChangeメソッドで作成
Payable.jsの作成
まずはPayable.jsコンポーネントを作成しましょう。
import { useState, useEffect } from "react";

function Payable(props) {
  // use hooks
  const [source, setSource] = useState({ key: "card", last4: "0000" });
  const [sources, setSources] = useState([
    { key: "dummy", last4: "choose payment card" }
  ]);

  // useEffect like componetDidMount
  useEffect(() => {
    const result = [
      { key: "card1", last4: "4242" },
      { key: "card2", last4: "5252" }
    ];
    // 読み込み終わったら、選択肢に反映
    setSources(result);
    // 取得できた最初の支払い方法をデフォルトに
    setSource(result[0]);
  }, []);

  const handleCharge = event => {
    event.preventDefault();
    alert(`${source.last4}(${source.key})で${props.amount}円はらいます`);
  };

  const handleChange = event => {
    const currentSource = sources.find(
      source => source.key === event.target.value
    );
    setSource(currentSource);
  };
  return (
    <>
      <form onSubmit={handleCharge}>
        <select value={source.key} onChange={handleChange}>
          {sources.map(value => {
            return (
              <option key={value.key} value={value.key}>
                {value.last4}
              </option>
            );
          })}
        </select>
        <button type="submit">Buy Now</button>
      </form>
    </>
  );
}

export default Payable;
こちらも特筆すべきポイントを解説していきます。
ReactHookの使用
import { useState, useEffect } from "react";
関数コンポーネントは従来、stateやライフサイクルフックを使用することができませんでした。
しかし、ReactHookを使用することでstateやライフサイクルフックと同様の機能を関数コンポーネントに実装できるようになりました。
上記のimportは、ReactHookのuseState、useEffectを使用するためのものです。
ちなみに、
- useStateは、Stateと同様の機能の使用
- useEffectは、componentDidMountと同様の機能の使用
を可能にするためのReactHookです。
stateを設定
  const [source, setSource] = useState({ key: "card", last4: "0000" });
  const [sources, setSources] = useState([
    { key: "dummy", last4: "choose payment card" }
  ]);
こちらでstateの実装をしています。
ダミーのクレカ情報を設定
  useEffect(() => {
    const result = [
      { key: "card1", last4: "4242" },
      { key: "card2", last4: "5252" }
    ];
    // 読み込み終わったら、選択肢に反映
    setSources(result);
    // 取得できた最初の支払い方法をデフォルトに
    setSource(result[0]);
  }, []);
現時点では、useEffectを使ってStateへダミーのクレジットカード情報を設定しています。
選択したカードをStateに設定
  const handleChange = event => {
    const currentSource = sources.find(
      source => source.key === event.target.value
    );
    setSource(currentSource);
  };
クレジットカードには1つ1つsourceが存在します。
このsourceには、Stripeがクレジットカードを特定するための情報が含まれていますが、セレクトボックスで選択したクレジットカードが「支払いで使用するカード」として認識されるために、Stateへ設定される形となります。
Payable.jsの埋め込み
作成したPayable.jsを[product].jsへ埋め込みましょう。
import React from "react";
import Payable from "../../components/Payable";
import { auth, firestore } from "../../lib/firebase";
import Link from "next/link";

class Product extends React.Component {
  constructor(props) {
    super(props);
    this.state = {
      isLogin: false,
      user: {}
    };
  }

  componentDidMount() {
    auth.onAuthStateChanged(authUser => {
      if (authUser) {
        const state = Object.assign(this.state, {
          isLogin: true,
          user: authUser
        });
        this.setState(state);
      } else {
        this.setState({
          isLogin: false,
          user: {}
        });
      }
    });
  }

  render() {
    return (
      <>
        <h1>pages/products/[product]</h1>
        <Link href="/products">
          <a>Go Back to Products List</a>
        </Link>
        <h2>PRODUCT DETAIL</h2>
        <ul>
          <li>PRODUCT NAME: {this.props.product.pageName}</li>
          <li>MONTHLY FEE: {this.props.product.monthlyFee}</li>
        </ul>
        {this.state.isLogin ? (
          <Payable amount={this.props.product.monthlyFee} />
        ) : (
          "PLEASE LOGIN"
        )}
      </>
    );
  }

  static async getInitialProps({ query }) {
    const result = await firestore
      .collection("fanPages")
      .doc(query.product)
      .get()
      .then(snapshot => {
        return snapshot.data();
      });
    return { product: result };
  }
}

export default Product;
以下のような画面が表示されていれば成功です。

Pay nowボタンを押すとアラートウィンドウが表示され、OKを押すと支払う流れになります。
まだStripeと接続していないため、あくまでブラウザ上での動きとなります。
また、クレジットカード自体もダミーで表示させているもののため、sourceを保有しているものではありません。
Payable.jsで登録したクレジットカードを表示できるようにする
以下のようにPayable.jsを編集します。
import { useState, useEffect } from "react";
import { firestore } from "../lib/firebase";

function Payable(props) {
  // use hooks
  const [source, setSource] = useState({ key: "card", last4: "0000" });
  const [sources, setSources] = useState([
    { key: "dummy", last4: "choose payment card" }
  ]);

  // useEffect like componetDidMount
  useEffect(() => {
    firestore
      .collection("stripe_customers")
      .doc(props.currentUid)
      .collection("sources")
      .onSnapshot(
        snapshot => {
          let newSources = [];
          snapshot.forEach(doc => {
            const id = doc.id;
            newSources.push({ key: id, last4: doc.data().last4 });
          });
          setSources(newSources);
          setSource(newSources[0]);
        },
        () => {
          const state = Object.assign(sources, {
            sources: []
          });
          setSources(state);
        }
      );
  }, [props.currentUid]);

  const handleCharge = event => {
    event.preventDefault();
    alert(`${source.last4}(${source.key})で${props.amount}円はらいます`);
  };

  const handleChange = event => {
    const currentSource = sources.find(
      source => source.key === event.target.value
    );
    setSource(currentSource);
  };
  return (
    <>
      <form onSubmit={handleCharge}>
        <select value={source.key} onChange={handleChange}>
          {sources.map(value => {
            return (
              <option key={value.key} value={value.key}>
                {value.last4}
              </option>
            );
          })}
        </select>
        <button type="submit">Buy Now</button>
      </form>
    </>
  );
}

export default Payable;
この状態では画面上にエラーが表示されます。
FirebaseError: Function CollectionReference.doc() requires its first argument to be of type non-empty string, but it was: undefined
これは、Firestoreの stripe_customers の次層に当たるドキュメント「uid」に何も入っていない、もしくは適切な値が入っていないことで表示されているのです。
Payable.js 15行目
.doc(props.currentUid)
現状では、currentUidには何も入っていません。
そのため、[product].jsの45行目を以下の様に編集しましょう。
<Payable amount={this.props.product.monthlyFee} currentUid={this.state.user.uid} />
すでにログインした状態かつクレジットカードの登録が済んでいれば、問題なくクレジットカード情報が取得され、先ほどのダミー同様に表示されるはずです。
もしクレジットカード登録が済んでいない場合は以下を参考にしてください。
nekorokkekun.hatenablog.com
動作確認
Buy nowボタンを押すと以下の様なアラートウィンドウが表示されるはずです。

この(wJQ8UakCNS3py0qU)という乱数文字は、Firestoreの stripe_customers > uid > sources の層で登録されているクレジットカード固有のIDになります。
Firebaseへ決済情報の登録
次にFirebaseへ決済情報の登録を行います。
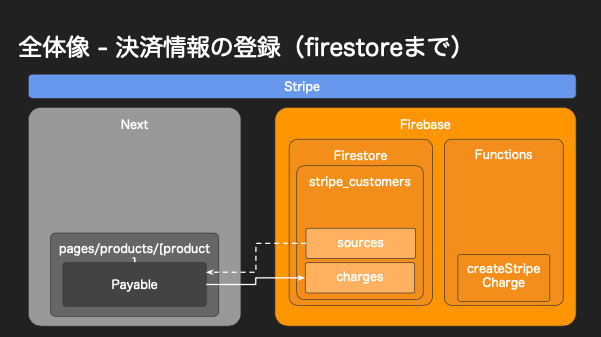
- Buy nowボタンを押す
- sourceのidが送信され、決済情報をFirebaseに送信する
- chargeドキュメントに決済情報が登録される
という流れで実装します。
Payable.jsの編集
再びPayable.jsを編集します。
import { useState, useEffect } from "react";
import { firestore } from "../lib/firebase";

function Payable(props) {
  // use hooks
  const [source, setSource] = useState({ key: "card", last4: "0000" });
  const [sources, setSources] = useState([
    { key: "dummy", last4: "choose payment card" }
  ]);

  // useEffect like componetDidMount
  useEffect(() => {
    firestore
      .collection("stripe_customers")
      .doc(props.currentUid)
      .collection("sources")
      .onSnapshot(
        snapshot => {
          let newSources = [];
          snapshot.forEach(doc => {
            newSources.push({ key: doc.data().id, last4: doc.data().last4 });
          });
          setSources(newSources);
          setSource(newSources[0]);
        },
        () => {
          const state = Object.assign(sources, {
            sources: []
          });
          setSources(state);
        }
      );
  }, [props.currentUid]);

  const handleCharge = event => {
    event.preventDefault();
    alert(`${source.last4}(${source.key})で${props.amount}円はらいます`);
    firestore
      .collection("stripe_customers")
      .doc(props.currentUid)
      .collection("charges")
      .add({
        source: source.key,
        amount: parseInt(props.amount)
      });
  };

  const handleChange = event => {
    const currentSource = sources.find(
      source => source.key === event.target.value
    );
    setSource(currentSource);
  };
  return (
    <>
      <form onSubmit={handleCharge}>
        <select value={source.key} onChange={handleChange}>
          {sources.map(value => {
            return (
              <option key={value.key} value={value.key}>
                {value.last4}
              </option>
            );
          })}
        </select>
        <button type="submit">Buy Now</button>
      </form>
    </>
  );
}

export default Payable;
変更点のみを解説します。
sourceのidを取得
          snapshot.forEach(doc => {
            newSources.push({ key: doc.data().id, last4: doc.data().last4 });
          });
先ほど説明した様に、クレジットカード登録時にStripeにyとって、sourceというカード識別・支払い情報識別のためのデータが作成されます。
適切に支払いを行うには、使用するカードを指定した際に、Stateへ「このカードで、このように支払いをする」という情報を取得しなければなりません。
key: doc.data().id,
と記述することで、sourceのidを取得できるため、使用するカードのsourceも取得できるというわけです。
支払い情報をFirestoreへ登録
  const handleCharge = event => {
    event.preventDefault();
    alert(`${source.last4}(${source.key})で${props.amount}円はらいます`);
    firestore
      .collection("stripe_customers")
      .doc(props.currentUid)
      .collection("charges")
      .add({
        source: source.key,
        amount: parseInt(props.amount)
      });
  };
handleChargeのメソッドは先ほどもありましたが、こちらではFirestoreに単発決済の情報を登録するためのメソッドを追記しました。
これによって、stripe_customers > charges 以降の層に単発決済の情報が登録されることとなります。
動作確認
Buy nowボタンを押し、アラートボタンもOKを押したらFirestoreに決済情報が登録されているはずです。動作確認をしてみましょう。
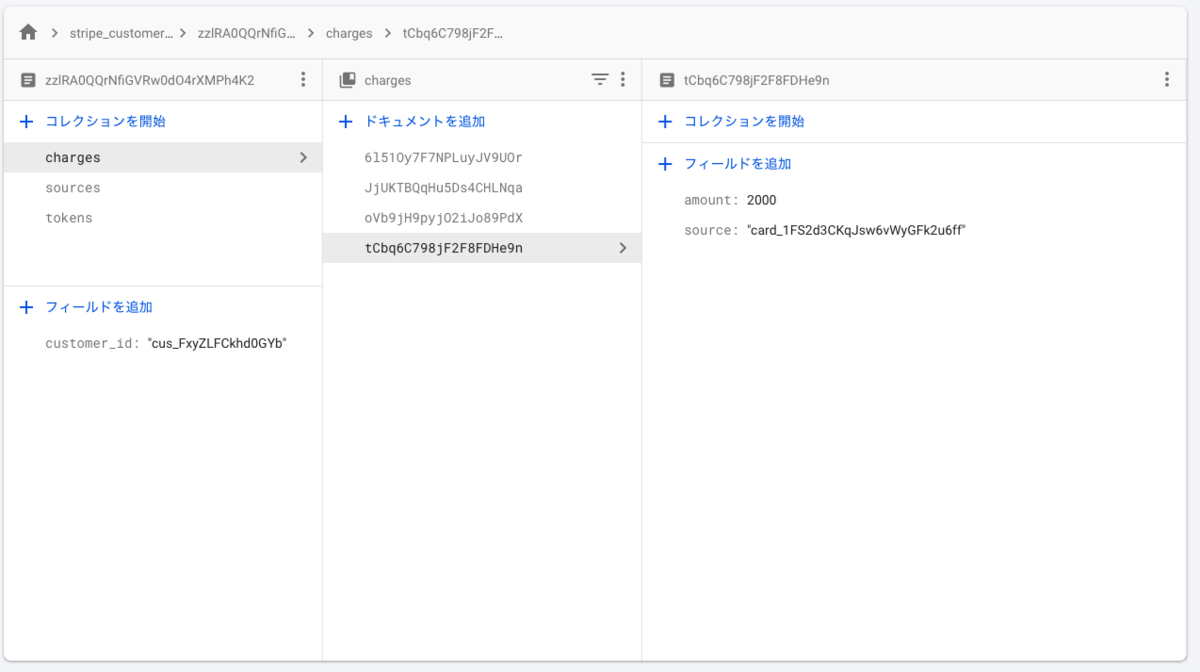
ただ、この状態では
- Stripeに決済情報が渡っていない
- 決済情報としてsourceとamountしか持っていない
ため、まだ単発決済はできていません。
ちなみに「決済情報としてsourceとamountしか持っていない」という問題を解消すると、以下の様なデータが登録される様になります。
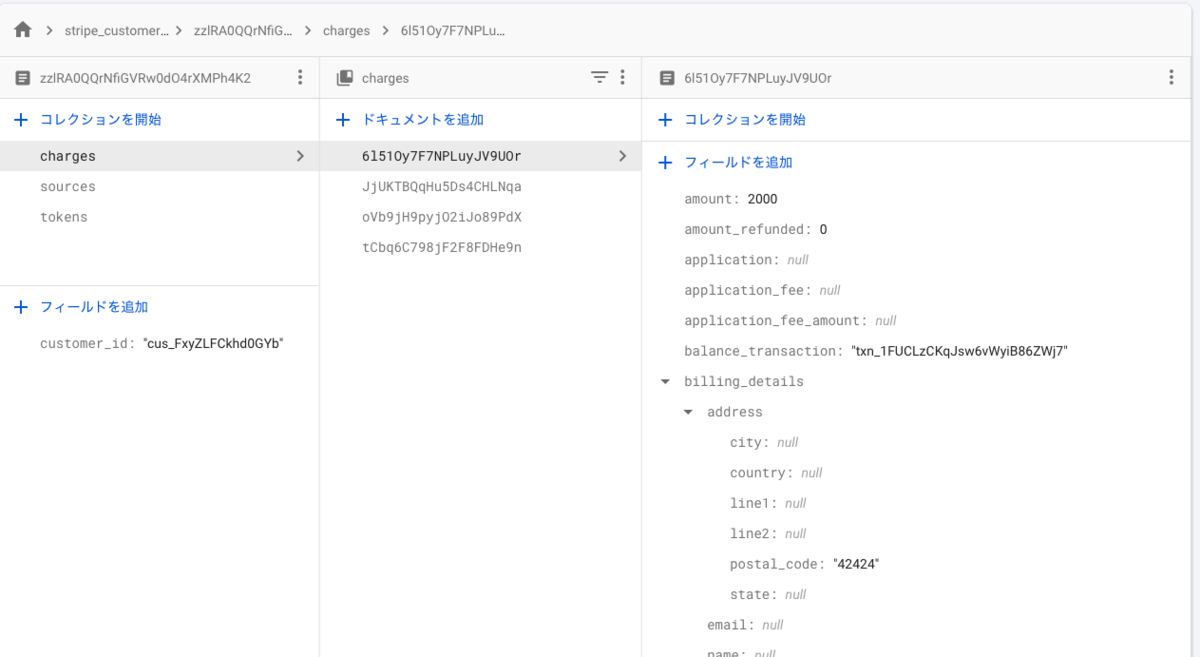
Firebase FunctionsでStripeに単発決済処理を送信

- Firebase FUnctionsでStripeに決済情報を渡す
- 完全な決済情報をFIrestoreに登録する
という2点を実装していきます。
Firebase Functionsの登録
functions/index.jsにcreateStripeChargeというFunctionを記述します。
// 上記省略
exports.createStripeCharge = functions.firestore
  .document("stripe_customers/{userId}/charges/{id}")
  .onCreate(async (snap, context) => {
    const val = snap.data();
    try {
      // Look up the Stripe customer id written in createStripeCustomer
      const snapshot = await admin
        .firestore()
        .collection(`stripe_customers`)
        .doc(context.params.userId)
        .get();
      const snapval = snapshot.data();
      const customer = snapval.customer_id;
      // Create a charge using the pushId as the idempotency key
      // protecting against double charges
      const amount = val.amount;
      const idempotencyKey = context.params.id;
      const charge = { amount, currency, customer };
      if (val.source !== null) {
        charge.source = val.source;
      }
      const response = await stripe.charges.create(charge, {
        idempotency_key: idempotencyKey
      });
      // If the result is successful, write it back to the database
      return snap.ref.set(response, { merge: true });
    } catch (error) {
      // We want to capture errors and render them in a user-friendly way, while
      // still logging an exception with StackDriver
      console.log(error);
      await snap.ref.set({ error: userFacingMessage(error) }, { merge: true });
      console.error(error);
      console.log(`user: ${context.params.userId}`);
    }
  });

function userFacingMessage(error) {
  return error.type
    ? error.message
    : "An error occurred, developers have been alerted";
}
書き込めたらFirebase Functionsにデプロイ していきます。
$yarn install
$ yarn deploy
もし以下の様なエラーが表示された場合は、使用しているnodeのバージョンと、functions/package.jsonのenginesに指定されているnodeのバージョンが異なるということです。
error functions@: The engine "node" is incompatible with this module. Expected version "8". Got "10.16.3"
error Commands cannot run with an incompatible environment.
info Visit https://yarnpkg.com/en/docs/cli/run for documentation about this command.
解決方法は以下を参照してください。
nekorokkekun.hatenablog.com
動作確認
先ほど同様、ブラウザからBuy nowボタンを押してみましょう。
その後、Stripeのコンソールにアクセスし、サイドメニューから「支払い」を押すと、単発決済が反映されているはずです。
またFirestoreのchargeドキュメント内にも、完璧な単発決済情報が登録されているはずです。
これで任意のクレジットカードでStripe決済が完了しました!お疲れ様でした!
【Next.js】FirebaseでStripeの単発決済の実装

以前まとめたこちらの記事の続きとなります。
nekorokkekun.hatenablog.com
nekorokkekun.hatenablog.com
以前の段階で、StripeとFirestoreとFirebase Authenticationのユーザーを同時に作成することができました。
こちらの記事では、Next.js上にFirebaseでStripeの単発決済の実装を行っていきます。
図解

上記の仕組みを以下の流れで実装していきます。
- submitNewChargeというイベントを持った決済ボタン作成
- ボタンを押すとFirestore上に stripe_customers > user_id > charges に決済情報が記録される
- Firebase FunctionsのcreateStripeChargeが起動し、Stripe上に決済情報を送信
- Stripe上で決済が行われる
ユーザーが行うのはボタンのクリックだけとなります。
実装
決済ボタン作成
まずは「submitNewChargeというイベントを持った決済ボタン作成」を行います。
イベントは以下の通りです。
    submitNewCharge = async (evt) => {
        evt.preventDefault();
        await
        db.collection('stripe_customers')
        .doc(firebase.auth().currentUser.uid)
        .collection('charges')
        .add({
            amount: 2000
          })
    }
また、ボタン自体は以下の通りです。
<button onClick={this.submitNewCharge}>決済</button>
amountを2000としていますが、実際には動的に商品の値段などをはめ込むシチュエーションが多いと思いますので、その場合は、以下のように記述しましょう。
    submitNewCharge = async (evt) => {
        evt.preventDefault();
        await
        db.collection('stripe_customers')
        .doc(firebase.auth().currentUser.uid)
        .collection('charges')
        .add({
            amount: this.props.detail.monthlyFee
          })
    }
createStripeChargeの作成
次にFirebase Functionsの作成を行います。
functions/index.js
exports.createStripeCharge = functions.firestore.document('stripe_customers/{userId}/charges/{id}').onCreate(async (snap, context) => {
  const val = snap.data();
  try {
    // Look up the Stripe customer id written in createStripeCustomer
    const snapshot = await admin.firestore().collection(`stripe_customers`).doc(context.params.userId).get()
    const snapval = snapshot.data();
    const customer = snapval.customer_id
    // Create a charge using the pushId as the idempotency key
    // protecting against double charges
    const amount = val.amount;
    const idempotencyKey = context.params.id;
    const charge = {amount, currency, customer};
    if (val.source !== null) {
      charge.source = val.source;
    }
    const response = await stripe.charges.create(charge, {idempotency_key: idempotencyKey});
    // If the result is successful, write it back to the database
    return snap.ref.set(response, { merge: true });
  } catch(error) {
    // We want to capture errors and render them in a user-friendly way, while
    // still logging an exception with StackDriver
    console.log(error);
    await snap.ref.set({error: userFacingMessage(error)}, { merge: true });
    return reportError(error, {user: context.params.userId});
  }
});
長いですが、要は「Firestoreの stripe_customers/{userId}/charges にドキュメントが作成されたら、その中から必要なデータを取得して、Stripeで決済処理をする」というだけです。
忘れずFunctionsをデプロイ しておきましょう。
$ cd functions
$cd yarn deploy
確認
実装自体は以上で完了です。実際にページから動作の確認をしてみましょう。
ボタンを押すとFirestoreとStripeに反映されています。
Firestore

Stripe

ちなみに以前の記事でご紹介したクレジットカード登録処理していない状態で決済を行うと、Firestoreに以下のように反映されます。

クレジットカード登録時にsourceが生成され、sourceの紐付きがある状態でなければStripeでの決済はできないからです。
ちなみにこのようにFirestoreに反映された決済はStripeには表示されません。
以上で単発決済の実装は完了です。お疲れ様でした!
【Next.js】StripeとFirestoreとFirebase Authenticationのユーザー同時削除

以前まとめたこちらの記事の続きとなります。
nekorokkekun.hatenablog.com
以前の段階で、StripeとFirestoreとFirebase Authenticationのユーザーを同時に作成することができました。
こちらの記事では、タイトルの通り、
StripeとFirestoreとFirebase Authenticationのユーザーを同時に削除
します。
図解
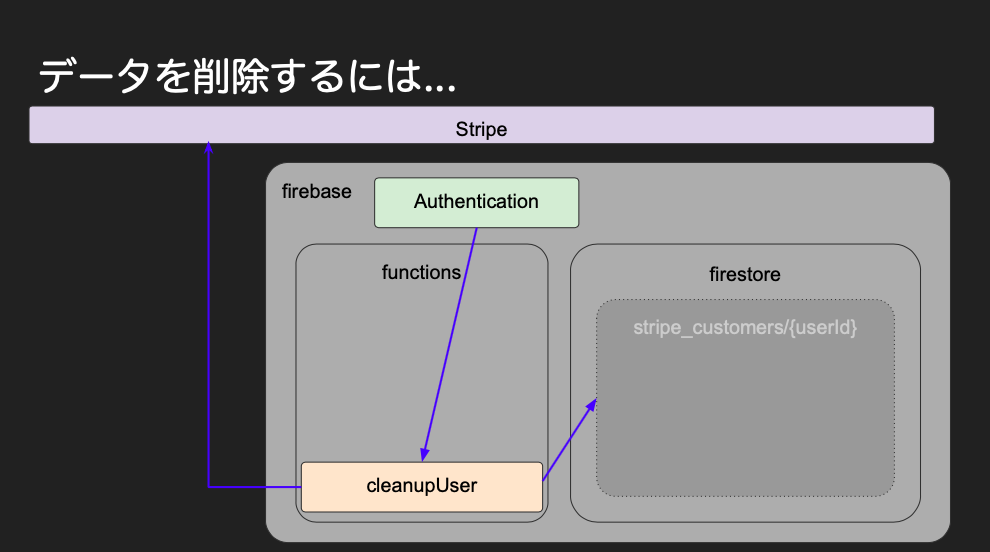
流れとしては簡単で、
- コンソールのFirebase Authenticatonからユーザー削除
- functionsのcleanupUserが起動
- Stripeに紐づく顧客アカウントを削除
- Firestoreに紐づくstripe_custmersの該当ドキュメントを削除
という感じになります。
一応、各コンソールを確認しておくと以下のとおりです。
Firebase Authentication

Firestore

Stripe

このように並べてみると、
uid => Firebase AuthenticationとFirestore
customer_id => FirestoreとStripe
とそれぞれつながっていることが分かりますね。
実装
以下のコードを追記しましょう。
functions/index.js
exports.cleanupUser = functions.auth.user().onDelete(async (user) => {
  const snapshot = await admin.firestore().collection('stripe_customers').doc(user.uid).get();
  const customer = snapshot.data();
  await stripe.customers.del(customer.customer_id);
  return admin.firestore().collection('stripe_customers').doc(user.uid).delete();
});
後はfunctionsディレクトリ内で以下のコマンドを実行すればOKです。
$ yarn deploy
Firebase FunctionsにcleanupUserがデプロイされたことを確認し、Firebaseのコンソール > Authentication からユーザーを削除してみましょう。
すると、cleanupUserが起動してStripeとFirestoreの紐づいたユーザーが削除されたはずです。
【React】関数コンポーネントにcomponentDidMount的なものを使いたい
Next.js(React)の関数コンポーネントにライフサイクルフックであるcomponentDidMount的な役割を持つ何かを実装したいときには、
useEffect(() => { ... } , []);
が使えます。
以下は一例です。
import { db }                from '../lib/db';
import React, { useEffect }  from 'react'; // importしておく
import Link                  from 'next/link';

import Header          from '../components/shared/Header';
import Footer          from '../components/shared/Footer';
import SiteDesctiption from '../components/index/Site-description';
import Wallpaper       from '../components/index/Wallpaper';

import GridList        from '@material-ui/core/GridList';
import GridListTile    from '@material-ui/core/GridListTile';
import GridListTileBar from '@material-ui/core/GridListTileBar';

import { makeStyles }  from '@material-ui/core/styles';

const useStyles = makeStyles(theme => ({

  popularArtists: {
    display:         'flex',
    flexWrap:        'wrap',
    justifyContent:  'space-around',
    overflow:        'hidden',
    backgroundColor: theme.palette.background.paper,
  },

  gridList: {
    flexWrap:  'nowrap',
    transform: 'translateZ(0)',
  },

}));

const Index = ({fanPages}) => {
    const classes = useStyles();
 // こんな感じで関数コンポーネントがマウントした際に行わせたい処理を書いておく
    useEffect(() => {
        console.log("hello")
      }, []);

    return (
        <>
            <Header />
            <Wallpaper />
            <SiteDesctiption />

            <div>
                <h3>アーティスト一覧</h3>
                <div className={classes.popularArtists}>
                    <GridList cellHeight={160} className={classes.gridList} cols={3}>
                        {fanPages.map(fanPage =>
                            <GridListTile key={fanPage.id} cols={fanPage.cols || 1}>
                                <Link href="/p/[detailid]" as={`/p/${fanPage.id}`}>
                                    <img src="../static/popular-artist-img.jpg" />
                                </Link>
                                <GridListTileBar title={fanPage.artistName} />
                            </GridListTile>
                        )}
                    </GridList>
                </div>
            </div>

            <Footer />
        </>
    );
}

Index.getInitialProps =

    async() => {
        let result =
                await
                    db.collection('fanPages')
                    .get()
                    .then(snapshot => {
                        let data = []
                        snapshot.forEach((doc) => {
                            data.push(
                            Object.assign({id: doc.id}, doc.data()))})
                        return data
                    }).catch(error => {
                        return []
    })

    return {fanPages: result}

};

export default Index;
【React】react-stripe-elementでフォームだけが表示されない
Next.js(React)でreact-stripe-elementを実装した際に、フォームだけが表示されないという現象が起こりました。
これは、Headタグ内で読み込んでいるstripe-jsのバージョンが不適合であったということでした。
<script src="https://js.stripe.com/v3/"></script>
を実装しなければならないところ
<script src="https://js.stripe.com/v2/"></script>
を実装していました。
react-stripe-elementでフォームだけが表示されない場合には読み込んでいるstrpe-jsのバージョンを疑ってみましょう!
【Next.js】Invariant Violation: React.Children.only expected to〜が吐き出される
こんなエラーが出た場合、
Invariant Violation: React.Children.only expected to receive a single React element child.
意味としては、「Reactのコンポーネントは、1つしかエレメントを内包できません」という意味となります。
        return (
            <StripeProvider stripe={this.state.stripe}>
                    <Head>
                        <script src="https://js.stripe.com/v2/"></script>
                    </Head>
                    <Header />
                    <div>
                        <h2>{detail.pageName}</h2>
                        <h4>概要</h4>
                        <p>{detail.body}</p>
                        <h4>アーティスト名 </h4>
                        <p>{detail.artistName}</p>
                        <h4>月額</h4>
                        <p>{detail.monthlyFee}円</p>
                    </div>
                    <Elements>
                        <CheckoutForm />
                    </Elements>
                    <Footer />
                    <style jsx>{`
                        div {
                            margin: 0 auto;
                            width: 80%;
                            height: 80%;
                        }
                        .fan-img {
                            display: block;
                        }
                    `}</style>
            </StripeProvider>
          );
ここでいうReactのコンポーネントは、
<StripeProvider stripe={this.state.stripe}>...</StripeProvide}>
のことで、その中のエレメントを何かしらの要素で1まとめにしてあげれば解決します。
以下のような感じです。
        return (
            <StripeProvider stripe={this.state.stripe}>
                <> // 追加
                    <Head>
                        <script src="https://js.stripe.com/v2/"></script>
                    </Head>
                    <Header />
                    <div>
                        <h2>{detail.pageName}</h2>
                        <h4>概要</h4>
                        <p>{detail.body}</p>
                        <h4>アーティスト名 </h4>
                        <p>{detail.artistName}</p>
                        <h4>月額</h4>
                        <p>{detail.monthlyFee}円</p>
                    </div>
                    <Elements>
                        <CheckoutForm />
                    </Elements>
                    <Footer />
                    <style jsx>{`
                        div {
                            margin: 0 auto;
                            width: 80%;
                            height: 80%;
                        }
                        .fan-img {
                            display: block;
                        }
                    `}</style>
                </> // 追加
            </StripeProvider>
          );